How to make linkedin Post assistant with n8n
In this article, I’ll walk you through how I built a LinkedIn Post Assistant using n8n, my go-to automation tool.
This assistant can be triggered in two ways:
Once triggered, the assistant handles everything end-to-end. It:
Writes the LinkedIn post text
Generates a matching image prompt
Creates the image
Publishes the post on LinkedIn
Sends a confirmation back to Telegram (including the text and image)
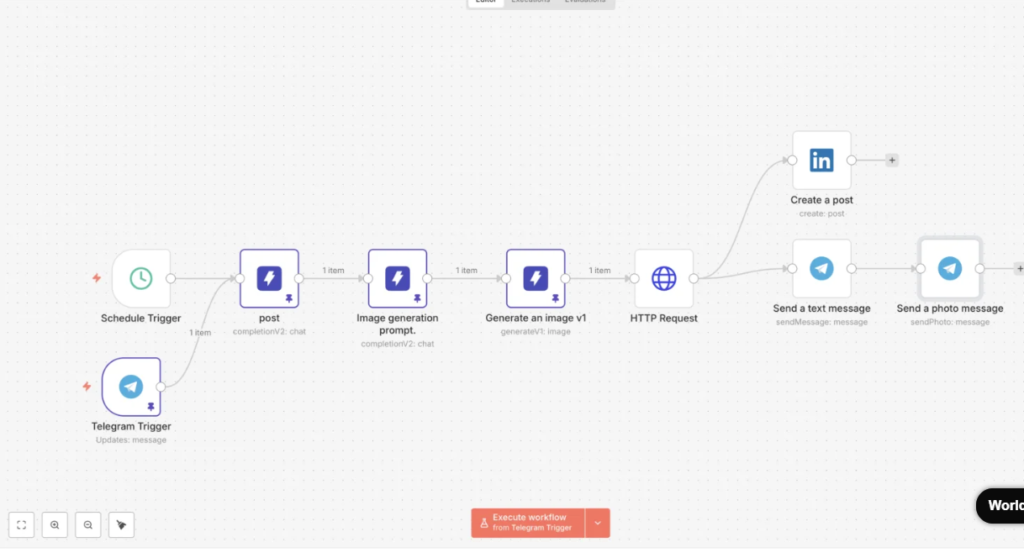
The workflow follows a simple, structured flow, exactly like the one I use in my own setup:
Schedule Trigger or Telegram Trigger → AI post creation → AI image prompt → AI image generation → HTTP fetch → LinkedIn post → Telegram message with image.
What you’ll build (high level)
Here’s the logic:
- Trigger
- Schedule (every Monday 10am, for example) OR Telegram message trigger
- Generate post content
- AI writes the LinkedIn post (hook, body, CTA, hashtags)
- Generate image prompt
- AI converts the post into a clean image prompt
- Generate image
- AI creates a social-post image
- Prepare the image
- HTTP Request node fetches the image as binary so LinkedIn can accept it
- Publish to LinkedIn
- Create the post (text + image)
- Notify on Telegram
- Send text + send photo back to me
Step-by-step: Build the workflow in n8n
Step 1) Add the triggers (Schedule + Telegram)
Option A: Schedule Trigger
- Add Schedule Trigger
- Choose:
- Weekly (e.g., every Monday)
- Or time-bound (e.g., every day at 9:30am)
Option B: Telegram Trigger
- Add Telegram Trigger
- Event: On message
- This lets you trigger the workflow by typing something like:
- “Create a LinkedIn post about customer trust in luxury retail”
- “Post idea: Excel shortcuts for managers”
 In my workflow, both triggers flow into the same next node.
Step 2) Create the “Post” generator node (AI text)
Add an AI Chat node (or your provider’s “chat/completion” node). Name it something like: post.
Prompt idea (copy/paste and adjust):
- System (role):
- “You are my LinkedIn content assistant. Write professional, human-sounding posts that are clear and actionable.”
- User:
- “Write a LinkedIn post in my voice as Muddaser Altaf.
Topic: {{$json.message || ‘Write about consistent learning and skill-building in retail training.’}}
Rules:
- 120–220 words
- Strong hook in first 2 lines
- Short paragraphs
- One practical tip list (3 bullets)
- End with a question
- Add 5–10 relevant hashtags (not too generic)
Output only the final post text.”
How to handle topic input
- If triggered by Telegram: use the Telegram message as the topic.
- If triggered by Schedule: use a default topic list (or pick randomly from an array).
Step 3) Create the “Image prompt” generator node (AI prompt)
Add a second AI node named something like: Image generation prompt.
User prompt example:
“Create an image prompt for a clean LinkedIn social post image based on this post:
{{ $json.postText }}
Rules:
- Minimal, modern style
- High contrast, readable typography
- Include a short headline (max 8 words)
- Include 1 supporting line (max 12 words)
- Background: simple gradient or subtle texture
- No logos
- Keep it professional for LinkedIn
Output only the image prompt.”
Tip: In n8n, map postText from the previous node output (whatever field your AI node returns).
Step 4) Generate the image
Add an image generation node (in your screenshot it’s something like Generate an image v1).
Configure:
- Prompt: output from Image generation prompt
- Size: 1024×1024 or 1024×576 (depending on what your generator supports best)
- Output: URL (most tools return a URL)
Step 5) HTTP Request: fetch the image as binary
LinkedIn posting usually needs the image as a file/binary (not just a URL).
Add HTTP Request node:
- Method: GET
- URL: the generated image URL from previous step
- Response format: File
- Download: true
- Set “Binary Property” name like:
image
Now you have the image ready for the LinkedIn node.
Step 6) Connect LinkedIn and create the post
Add LinkedIn node: Create a post
This is the most important step, because once LinkedIn is properly connected, everything becomes truly automated.
Inside the node:
- Credentials: connect your LinkedIn account
- Text/body: map the post text from Step 2
- Media/image: map the binary file from Step 5 (property
image)
If your node asks for extra details:
- Visibility: Public (or your preference)
- Author: your LinkedIn profile
Step 1: Create a LinkedIn Developer App
In LinkedIn Developer Portal:
- Create a new app
- Associate it with a LinkedIn Company Page (LinkedIn requires this for the n8n credential setup) n8n Docs
- Go to Products and request/enable these products:
- Share on LinkedIn
- Sign In with LinkedIn using OpenID Connect
- (Optional) Advertising API if you’re using organization features in some setups n8n Docs
Step 2: Copy Client ID + Client Secret into n8n
From the app’s Auth tab:
- Copy Client ID
- Copy Primary Client Secret
- Paste them into your LinkedIn credential in n8n n8n Docs
Step 3: Click “Connect / Authorize” in n8n
When you click connect, n8n opens LinkedIn login → you approve permissions → LinkedIn sends n8n a code → n8n swaps it for an access token automatically (that’s the OAuth flow)
Step 7) Telegram confirmation (text + photo)
Add Telegram → Send a text message
- Chat ID: your chat ID
- Message:
- “ Posted on LinkedIn!\n\n{{postText}}\n\nTime: {{ $now }}”
Then add Telegram → Send a photo message
- Image: map the same binary property
image - Caption: optional (short)
This way, every time the assistant posts, you get proof in Telegram.
Recommended upgrades (to make it reliable)
1) Add an approval step (optional but smart)
Before posting to LinkedIn, send the draft to Telegram with two buttons:
- Approve
 Reject
This prevents accidental posting.
2) Add topic rotation for scheduled runs
Create a simple list:
- AI for retail sales
- Diamonds education
- Training culture
- Excel/PowerPoint productivity
- Leadership micro-skills
Pick one per week automatically.
3) Add safety rules (avoid repetitive spam)
In your prompt:
- “Do not repeat the same hook structure more than once in 4 posts.”
- “Avoid generic phrases like ‘In today’s fast-paced world’.”
Example: What I send on Telegram to trigger it
- “Create a LinkedIn post about handling objections in premium jewelry retail.”
- “Write a post about why consistent training beats motivation.”
- “Make a post: Excel shortcut that saves managers 30 minutes weekly.”
Final thoughts
This setup gives me a real “content machine”:
- I can run it weekly on autopilot
- or trigger it anytime from Telegram
- it creates the post + image
- publishes on LinkedIn
- and reports back to me on Telegram